GitHub + Hexo 搭建个人博客详细教程
我的博客
本博客基于Hexo,所以我们首先需要了解一下我们搭建博客需要用到的框架。大家可以进入Hexo官网进行详细查看,因为 Hexo 的创建者是台湾人,对中文的支持很友好,可以选择中文进行查看。
最后,如果项目和教程对你有所帮助或者你看见了还算比较喜欢,欢迎给我的 github项目仓库 star,谢谢您!
GitHub 创建个人仓库
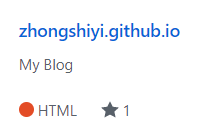
登录到 GitHub, 点击 New repository 创建新仓库,仓库名为:用户名 + .github.io 这个用户名就是你的 GitHub 账户的用户名,这是固定写法,千万不要搞错。比如我的仓库名为:
安装 Git
为了把本地的网页文件上传到 GitHub 上面去,我们需要用到分布式版本控制工具–Git
若安装失败,请看其他Git安装教程。安装成功后,鼠标右键打开 Git Bash Here
连接 GitHub 与本地
打开 Git Base Here 并依次输入:
git config --global user.name "你的github用户名"
git config --global user.email "你的邮箱"
然后生成密钥 SSH key:
ssh-keygen -t rsa -C "你的邮箱" 打开 GitHub,点击头像下面的 settings ,再点击SSH and GPG keys,新建一个SSH,名字随便。
找到生成的.ssh 的文件夹中的 id_rsa.pub 密钥,打开,将内容全部复制到上图的 key 中,并点击 Add SSH key 。
输入ssh git@github,com,如果如下图显示出现你的用户名,那就成功了。
安装Node.js
Hexo 基于 Node.js,选择对于你的电脑合适的 Node.js 进行下载。安装后,检测 Node.js 是否安装成功,可在 Git Base 中输入 node -v,显示如图,则表明成功。
安装Hexo
在合适的地方新建一个文件夹,用来存放自己的博客文件。
在该目录下右键打开 Git Base Here,打开git的控制台窗口。
输入 npm install -g hexo-cli 安装 Hexo。
安装完毕之后,输入 hexo -v 验证是否安装成功。
然后我们就要初始化我们的博客网页啦,输入 hexo init 初始化文件夹,接着输入 npm install 安装必备的组件。
然后我们的本地网站配置就弄好了,接着输入 hexo g ,生成静态网页,再输入 hexo s ,把网站部署到本地。
用浏览器打开 http://localhost:4000 ,就可以看到我们的博客啦。
按下 Ctrl + C 关闭本地服务器。
推送网站
刚才我们只能在本地预览,接下来我们就要发布网站,让我们的网站可以被其他所有人访问。首先我们要找到 站点配置文件 ,就是在 Hexo 安装目录下的 _config.yml 文件。
打开它,找到 deploy 并修改为:
deploy:
  type: git
  repository: git@github.com:zhongshiyi/zhongshiyi.github.io.git
  branch: master
repository 改成你自己的仓库地址,即创建的 你的用户名.github.io 仓库的地址,并保存。
然后我们依次在 Git Base Here 中输入:
hexo clean
hexo g
hexo d
或则输入 hexo g -d,若出现 Deploy done: git 则部署成功,如图
用浏览器输入我们的博客地址: 用户名 + github.io ,如我的博客 zhongshiyi.github.io
然后你就会发现你的博客已经上线了,能够在网络上被访问了。
设置个人域名
现在你的个人网站的地址是:yourname.github.io ,如果觉得这个网址逼格不太够,这就需要你设置个人域名了。但是需要花钱。
不过,这一步不是必要的,如果小伙伴不想现在就买域名,那就可以直接观看下一篇博客
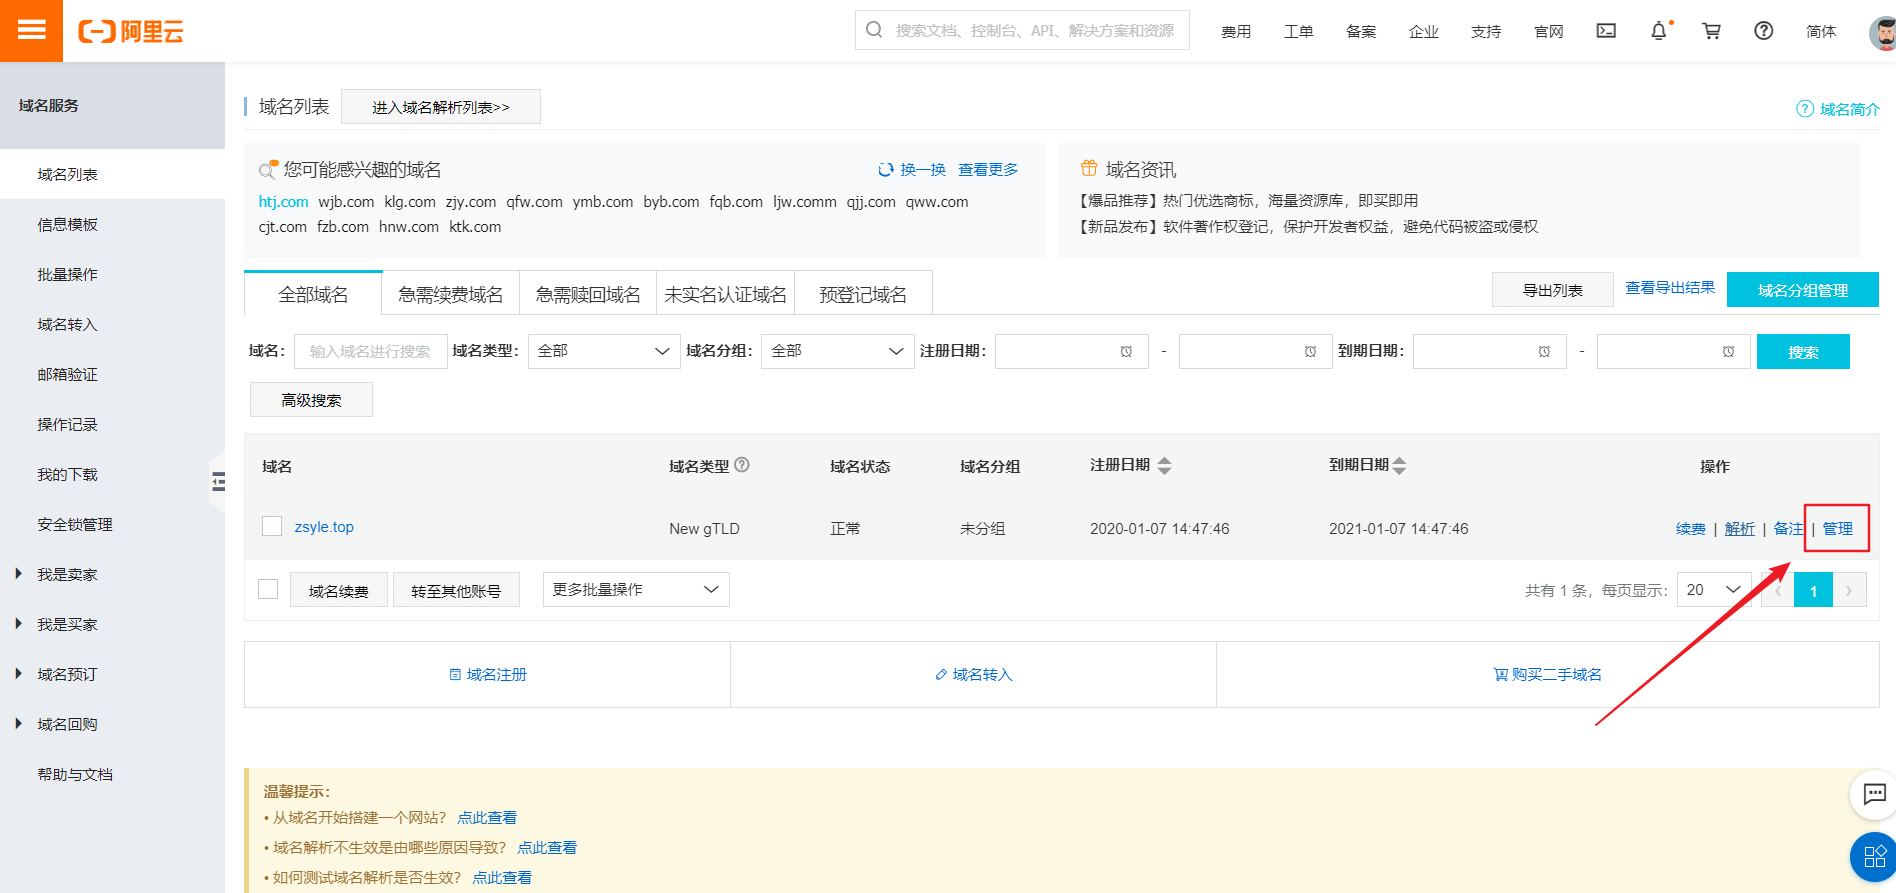
首先你得买一个专属域名,百度云,阿里云都能买。
这篇以阿里云为例,阿里云官方购买:
阿里云 DNS 解析
然后实名认证后进入阿里云控制台,点云解析进去,找到你刚买的域名,点进去添加一条解析记录,如下图所示:
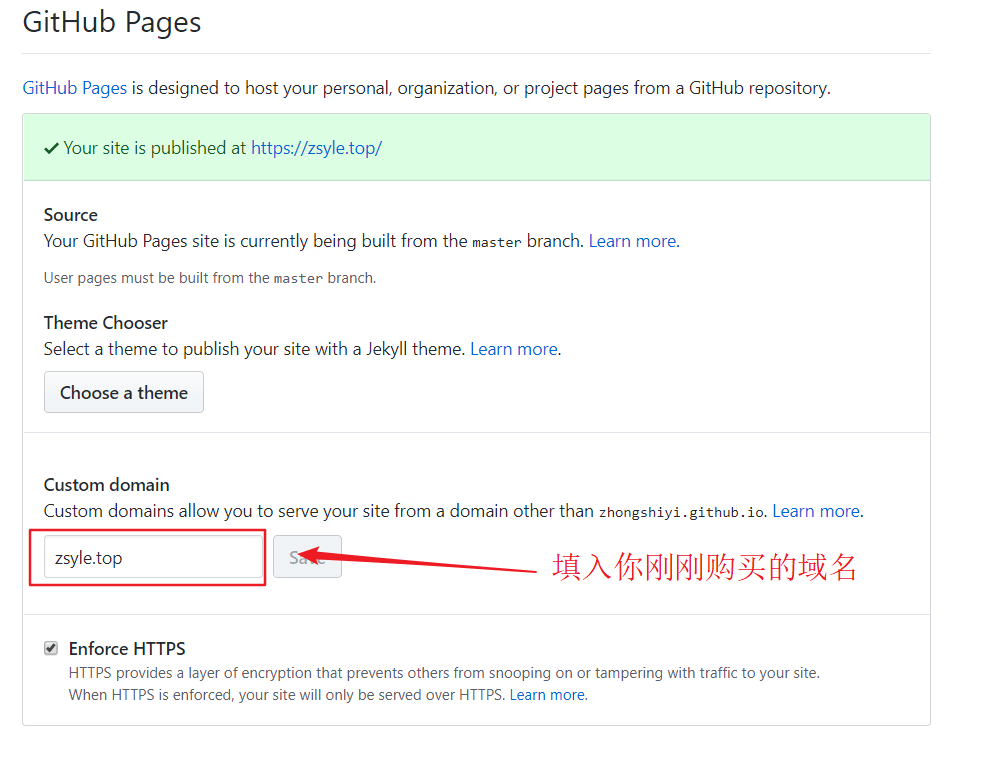
然后打开你的github博客项目,点击settings,拉到下面Custom domain处,填上你自己的域名,保存:
这时候你的项目根目录应该会出现一个名为CNAME的文件了。如果没有的话,打开你本地博客/source目录,我的是D:\Blog\source,新建CNAME文件,注意没有后缀。然后在里面写上你的域名,保存。最后运行hexo g、hexo d上传到github。
过不了多久,再打开你的浏览器,输入你自己的专属域名,就可以看到搭建的网站啦!
Cloudflare DNS 解析
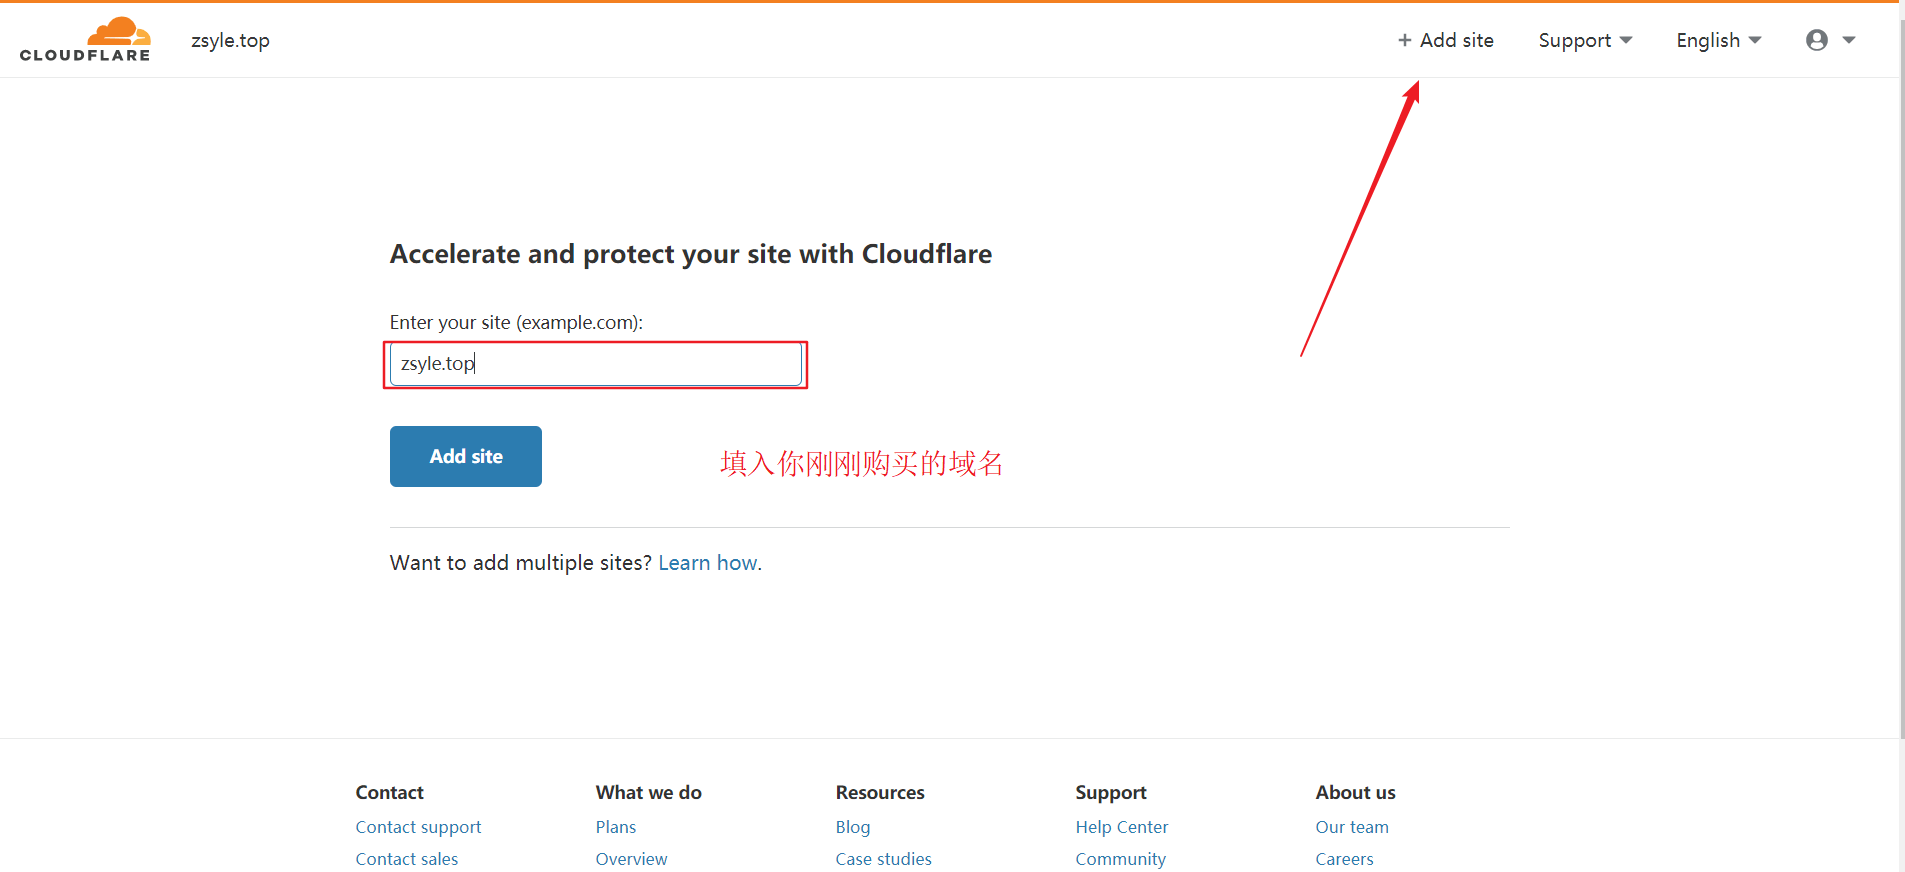
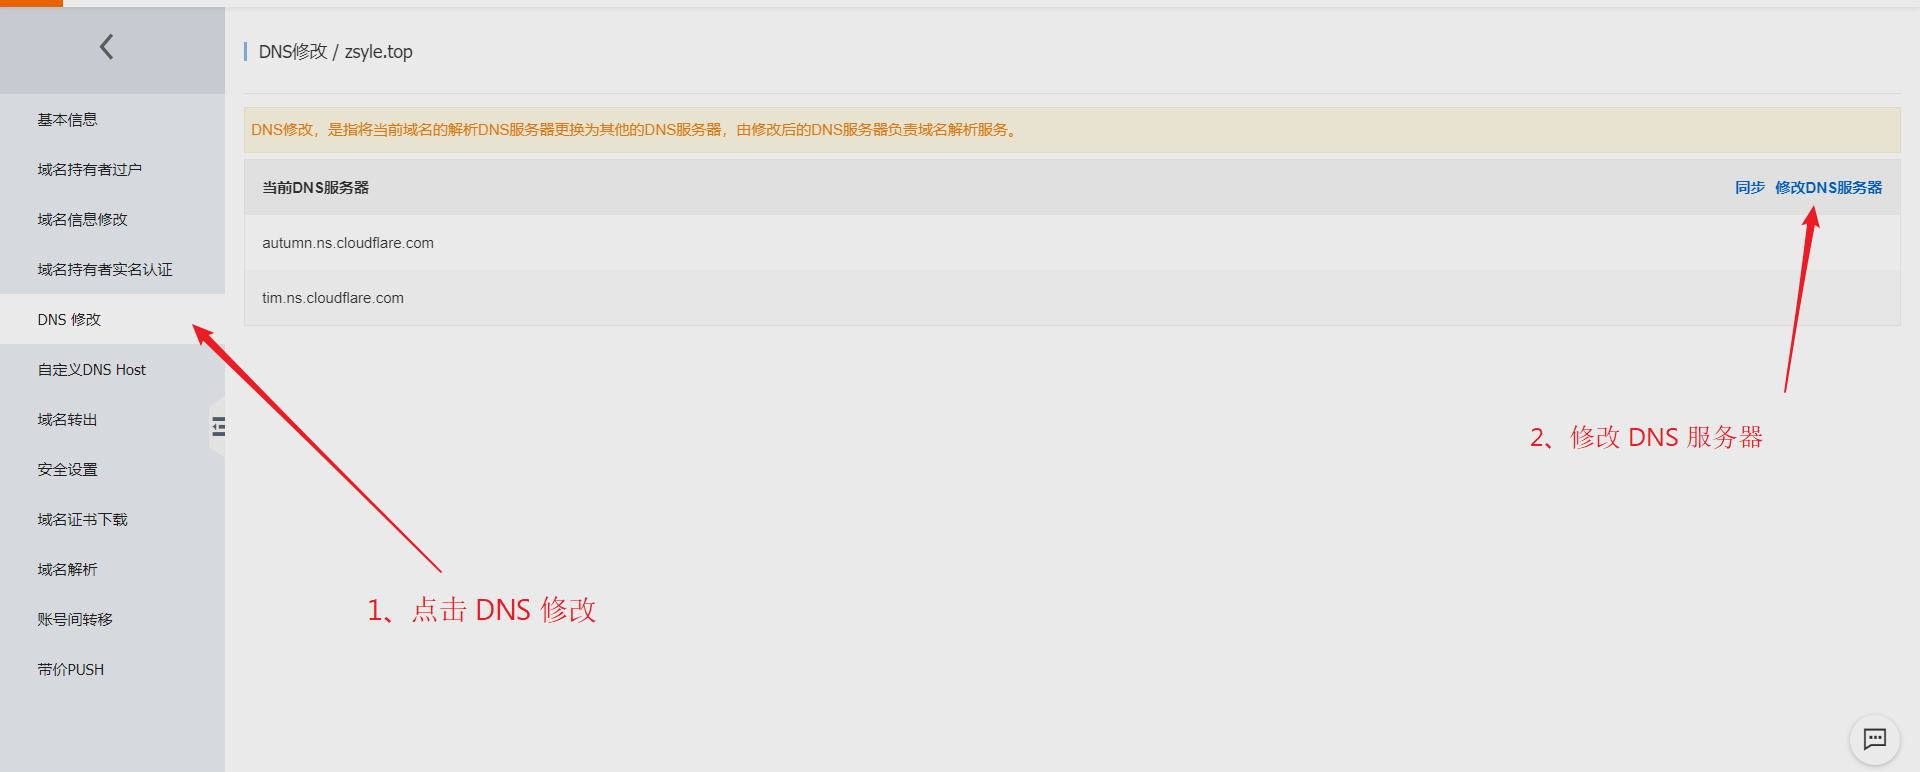
一名朋友告诉我,阿里云的解析速度不理想,于是他推荐了我一个 Cloudflare 网站用来 DNS 解析,这里我也给大家推荐一下吧。
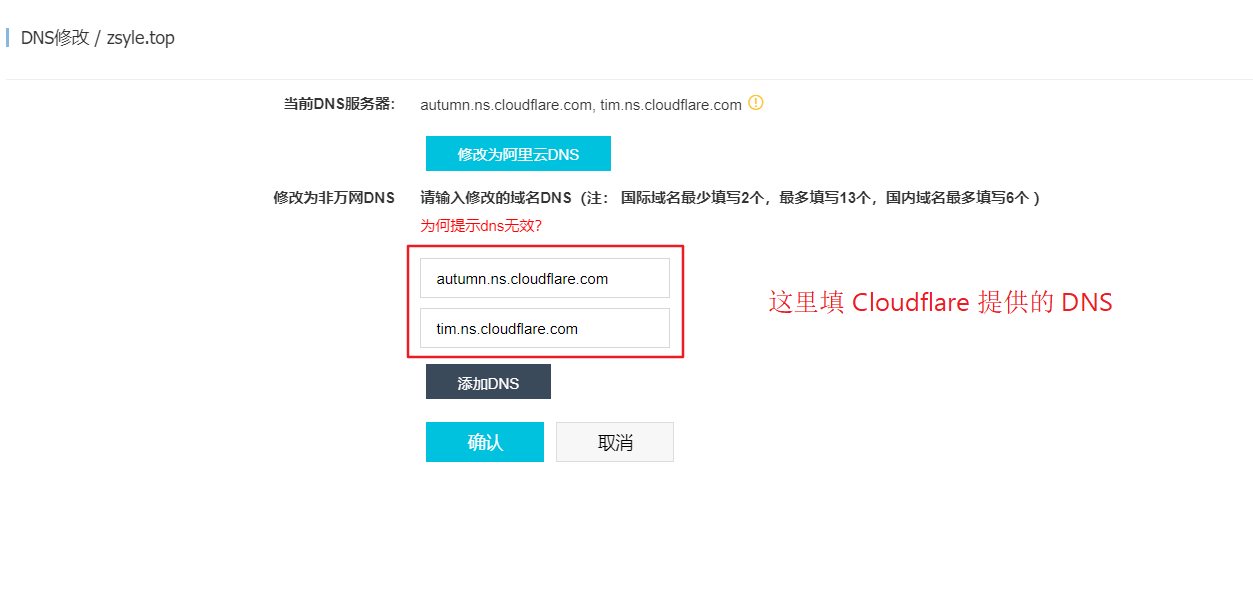
现在我们去阿里云的域名控制面板修改 DNS
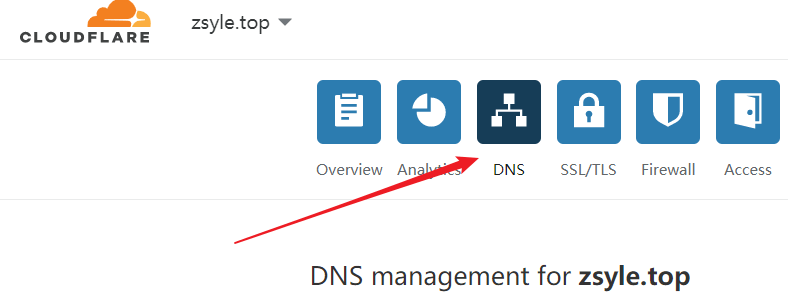
到这里,阿里云域名面板的设置到这里结束,下面我们回到 Cloudflare 面板,找到你的域名,点 DNS。
下面添加记录基本和阿里云一样,添加一条像这样的记录:
这里就解析配置完毕了。
优化网站加载速度
优化图片加载
修改 /themes/matery/source/js中的matery.js 文件
第103行:
$('#articleContent, #myGallery').lightGallery({
    selector: '.img-item',
    // 启用字幕
    subHtmlSelectorRelative: true,
    showThumbByDefault: false   //这句加上
});

$(document).find('img[data-original]').each(function(){    //这几句也加上
    $(this).parent().attr("href", $(this).attr("data-original"));
});
再装一个插件:
npm install hexo-lazyload-image --save再在博客根目录下的_config.yml文件中添加:
lazyload:
  enable: true
  onlypost: false # optional
  loadingImg: # optional eg ./images/loading.gif
  isSPA: false # optional
再部署一次,就实现了博客的图片懒加载
Gulp 实现代码压缩
Gulp 实现代码压缩,以提升网页加载速度。
1 首先安装 Gulp 插件和几个功能模块,依次运行以下命令。
npm install gulp --save  #安装gulp
# 安装功能模块
npm install gulp-htmlclean gulp-htmlmin gulp-uglify gulp-imagemin --save
# 额外的功能模块
npm install gulp-debug gulp-clean-css gulp-changed gulp-if gulp-plumber gulp-babel babel-preset-es2015 del --save
2 接下来在博客的根目录下新建gulpfile.js文件,并复制下面的内容到文件中。
var gulp = require("gulp");
var debug = require("gulp-debug");
var cleancss = require("gulp-clean-css"); //css压缩组件
var uglify = require("gulp-uglify"); //js压缩组件
var htmlmin = require("gulp-htmlmin"); //html压缩组件
var htmlclean = require("gulp-htmlclean"); //html清理组件
var imagemin = require("gulp-imagemin"); //图片压缩组件
var changed = require("gulp-changed"); //文件更改校验组件
var gulpif = require("gulp-if"); //任务 帮助调用组件
var plumber = require("gulp-plumber"); //容错组件(发生错误不跳出任务,并报出错误内容)
var isScriptAll = true; //是否处理所有文件,(true|处理所有文件)(false|只处理有更改的文件)
var isDebug = true; //是否调试显示 编译通过的文件
var gulpBabel = require("gulp-babel");
var es2015Preset = require("babel-preset-es2015");
var del = require("del");
var Hexo = require("hexo");
var hexo = new Hexo(process.cwd(), {}); // 初始化一个hexo对象

// 清除public文件夹
gulp.task("clean", function() {
  return del(["public/**/*"]);
});

// 下面几个跟hexo有关的操作,主要通过hexo.call()去执行,注意return
// 创建静态页面 (等同 hexo generate)
gulp.task("generate", function() {
  return hexo.init().then(function() {
    return hexo
      .call("generate", {
        watch: false
      })
      .then(function() {
        return hexo.exit();
      })
      .catch(function(err) {
        return hexo.exit(err);
      });
  });
});

// 启动Hexo服务器
gulp.task("server", function() {
  return hexo
    .init()
    .then(function() {
      return hexo.call("server", {});
    })
    .catch(function(err) {
      console.log(err);
    });
});

// 部署到服务器
gulp.task("deploy", function() {
  return hexo.init().then(function() {
    return hexo
      .call("deploy", {
        watch: false
      })
      .then(function() {
        return hexo.exit();
      })
      .catch(function(err) {
        return hexo.exit(err);
      });
  });
});

// 压缩public目录下的js文件
gulp.task("compressJs", function() {
  return gulp
    .src(["./public/**/*.js", "!./public/libs/**"]) //排除的js
    .pipe(gulpif(!isScriptAll, changed("./public")))
    .pipe(gulpif(isDebug, debug({ title: "Compress JS:" })))
    .pipe(plumber())
    .pipe(
      gulpBabel({
        presets: [es2015Preset] // es5检查机制
      })
    )
    .pipe(uglify()) //调用压缩组件方法uglify(),对合并的文件进行压缩
    .pipe(gulp.dest("./public")); //输出到目标目录
});

// 压缩public目录下的css文件
gulp.task("compressCss", function() {
  var option = {
    rebase: false,
    //advanced: true,               //类型:Boolean 默认:true [是否开启高级优化(合并选择器等)]
    compatibility: "ie7" //保留ie7及以下兼容写法 类型:String 默认:''or'*' [启用兼容模式; 'ie7':IE7兼容模式,'ie8':IE8兼容模式,'*':IE9+兼容模式]
    //keepBreaks: true,             //类型:Boolean 默认:false [是否保留换行]
    //keepSpecialComments: '*'      //保留所有特殊前缀 当你用autoprefixer生成的浏览器前缀,如果不加这个参数,有可能将会删除你的部分前缀
  };
  return gulp
    .src(["./public/**/*.css", "!./public/**/*.min.css"]) //排除的css
    .pipe(gulpif(!isScriptAll, changed("./public")))
    .pipe(gulpif(isDebug, debug({ title: "Compress CSS:" })))
    .pipe(plumber())
    .pipe(cleancss(option))
    .pipe(gulp.dest("./public"));
});

// 压缩public目录下的html文件
gulp.task("compressHtml", function() {
  var cleanOptions = {
    protect: /<\!--%fooTemplate\b.*?%-->/g, //忽略处理
    unprotect: /<script [^>]*\btype="text\/x-handlebars-template"[\s\S]+?<\/script>/gi //特殊处理
  };
  var minOption = {
    collapseWhitespace: true, //压缩HTML
    collapseBooleanAttributes: true, //省略布尔属性的值  <input checked="true"/> ==> <input />
    removeEmptyAttributes: true, //删除所有空格作属性值    <input id="" /> ==> <input />
    removeScriptTypeAttributes: true, //删除<script>的type="text/javascript"
    removeStyleLinkTypeAttributes: true, //删除<style>和<link>的type="text/css"
    removeComments: true, //清除HTML注释
    minifyJS: true, //压缩页面JS
    minifyCSS: true, //压缩页面CSS
    minifyURLs: true //替换页面URL
  };
  return gulp
    .src("./public/**/*.html")
    .pipe(gulpif(isDebug, debug({ title: "Compress HTML:" })))
    .pipe(plumber())
    .pipe(htmlclean(cleanOptions))
    .pipe(htmlmin(minOption))
    .pipe(gulp.dest("./public"));
});

// 压缩 public/uploads 目录内图片
gulp.task("compressImage", function() {
  var option = {
    optimizationLevel: 5, //类型:Number  默认:3  取值范围:0-7(优化等级)
    progressive: true, //类型:Boolean 默认:false 无损压缩jpg图片
    interlaced: false, //类型:Boolean 默认:false 隔行扫描gif进行渲染
    multipass: false //类型:Boolean 默认:false 多次优化svg直到完全优化
  };
  return gulp
    .src("./public/medias/**/*.*")
    .pipe(gulpif(!isScriptAll, changed("./public/medias")))
    .pipe(gulpif(isDebug, debug({ title: "Compress Images:" })))
    .pipe(plumber())
    .pipe(imagemin(option))
    .pipe(gulp.dest("./public"));
});
// 执行顺序: 清除public目录 -> 产生原始博客内容 -> 执行压缩混淆 -> 部署到服务器
gulp.task(
  "build",
  gulp.series(
    "clean",
    "generate",
    "compressHtml",
    "compressCss",
    "compressJs",
    "compressImage",
    gulp.parallel("deploy")
  )
);

// 默认任务
gulp.task(
  "default",
  gulp.series(
    "clean",
    "generate",
    gulp.parallel("compressHtml", "compressCss", "compressImage", "compressJs")
  )
);
//Gulp4最大的一个改变就是gulp.task函数现在只支持两个参数,分别是任务名和运行任务的函数
3 最后 hexo clean && hexo g && gulp && hexo d 就可以了。
注意,很可能你会运行到第三步,也就是运行gulp压缩命令时会报错
那是因为gulp安装的本地版本和hexo自带的版本不对应导致,第三步gulp压缩可以用下面命令强制使用本地版本:
node ./node_modules/gulp/bin/gulp.js这样代码的优化就完成了。再hexo g、hexo d部署到网站就可以了。
下一篇博客介绍如何利用 GitHub Actions 工作流自动部署博客
参考文章:
